Hey folks. Development of Level Squared continues apace! The pipeline has been in full force and we’ve been pumping out new levels at a good rate. We’re in that really good place where we’re making some good progress, we’re making some good content, and it looks good and works well, and we haven’t shown it to anyone yet, so we can still operate under the assumption that it’s good!
After writing last week’s post, I felt like going a bit more in depth on the specific way I go about designing levels and then building them in Unity, to give a bit more insight into that part of the process.
First thing I start with is an overall purpose for the level. At the moment I’m still working on levels from near the start of the game, so usually the idea is to either introduce a new mechanic, or iterate on that mechanic to give the player an idea of what it can do.
So – here’s the design document entry for a level I was working on last night:
![]()
The purpose of this level is to introduce the player to the concept of projecting physics blocks – blocks that will react to gravity and fall to the ground rather than remain wherever they are projected to. It is also using Passive Projectors – blocks that can project other blocks and are operated by the player jumping onto a button. These were introduced one level earlier, so are still quite new to the player.
Usually, the first thing I do is sketch up an approximation of what I think will work. This doesn’t always end up looking like the final level, but it helps to get an idea of my starting point, and to get an idea of what will fit within the level, and what the flow of interactions will end up looking like. Now, I didn’t do that in this case, but as a general guide for how useful those sketches are here’s one for a later level:

It’s fine, I totally know what all this means…
The reason I didn’t do a sketch in this case what because I had already made a prototype version of this level earlier, so I already had an idea of the mechanics that I wanted to use. I’d made this a few weeks earlier before we had everything set up and ready to go with the level building pipeline, so it looks a bit different to the current levels.
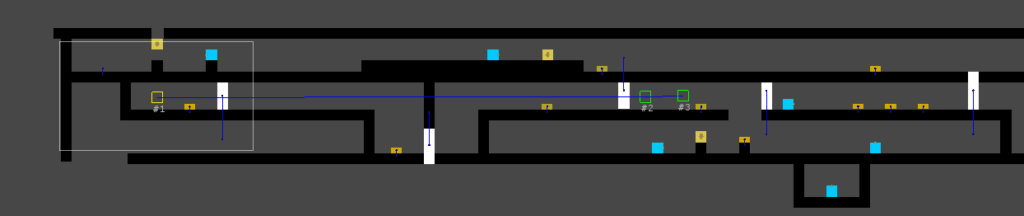
This prototype doesn’t use the basic layout that our levels are built on, nor does it make use of many of the prefabs that we are now using to build levels. However, it was useful for me to play around with the mechanics and get an idea of how they worked and what was required to get them to work properly. For example, I learned that you need to raise physics blocks into the air when projecting them, in order to drop them onto a button. If everything is laid out in a line, then the blocks are projected inside the buttons and everything fails.
Then once I have these basic concepts worked out in my head/on paper/wherever I jump into Unity and build out the level, using a method I call ‘trial and error’. And I recorded myself building a level last night, which you can watch below (I sped it up – a lot, I am nowhere near this fast don’t worry).
Things you may or may not notice in this video:
- I forgot to turn the colliders on in the first playthrough – I do this Every. Single. Level.
- Buttons and moving walls don’t really work properly in this video – these will get fixed up in the programming pass later on.
- I do a lot of drawing in blocks then erasing them without testing. I’m kinda just freestyling this whole design, so I get halfway through trying something out then change my mind. There’s also things I already know won’t work. For example, the player needs a certain amount of head room for jumps to work. I know how big this is, so if I notice I’ve blocked it, I go back and try again.
- One thing I’m trying to balance is having enough open space within the level with having enough black space for the art design. This is a tough thing to balance and I often second guess what’s right or wrong.
So there you have it, that’s the method that I use to create our first draft levels. I’m trying to get around five of these done each week so that we have a big ol’ bunch of them to test in a few weeks.
Next week I’ll go into a bit more detail on how I think about introducing mechanics, and how I try to guide the player through what needs doing and what happens as a result.